บทความ

กำลังแสดงโพสต์จาก 2021

เปลี่ยนขนาดฟ้อนต์ description header ของ contempo theme

รูปภาพ
 เปลี่ยนขนาดฟ้อนต์ description header ของ contempo theme ใส่โค้ด เพิ่ม ใน Advanced css .header-widget p { font-size: 30px; } ภาพก่อน ภาพหลัง ใส่ css เปลี่ยนขนาดฟ้อนต์

ซ่อนแถบนำทางด้านข้าง (contempo theme)

รูปภาพ
  To hide the sidebar navigation เพิ่มโค้ด   display:none !important;  ไปที่ class ตัวอย่าง .sidebar-container { display:none !important; width: 0px !important; บรรทัดนี้ไม่ต้องแก้ก็ได้ max-width: 0px !important;   บรรทัดนี้ไม่ต้องแก้ก็ได้ } ตัวอย่าง 

จัดภาพให้อยู่กลางในแนวนอนของหน้าเว็บ

ตำแหน่งภาพ ในการจัดให้ภาพอยู่กลางหน้าเว็บ ให้ใช้โค้ด เพิ่ม margin จึงจะจัดกลางได้   display :  block ;   margin-left :  auto ;   margin-right :  auto ;   width :  77% ;

วิธีเปลี่ยนขนาดภาพ cover header และภาพของ post ของ Theme Soho ใน blogger

 วิธีเปลี่ยนขนาดภาพ cover page ของ Theme Soho วิธีเปลี่ยนขนาดภาพ cover header ของ Theme Soho ใน blogger ไปที่ Theme->Customize->Advanced->Add CSS จากนั้นใส่โค้ดนี้ลงในกล่องโค้ด body.homepage-view .hero-image.has-image { height: 62.5 vw; max-height: 75 vh; min-height: 200 px;  *เปลี่ยนขนาดความสูง-กว้างตามที่ต้องการ width: 100%; } หากต้องการเปลี่ยนขนาดภาพของโพสต์ในบล็อก ให้เพิ่มโค้ดด้านล่างนี้ลงในกล่องโค้ดด้วย .snippet-thumbnail img { width: 100% ; height: 100%   *เปลี่ยนขนาดความสูง-กว้างตามที่ต้องการ } กดปุ่มบันทึก แล้วดูผลลัพธ์

วิธีตั้งค่าให้ Post ในหน้าแรกของ Blogger แสดงเต็มโดยไม่มี Jump Break (Contempo theme)

รูปภาพ
วิธีตั้งค่าให้ Post ในหน้าแรกของ Blogger แสดงเต็มโดยไม่มี Jump Break (Contempo theme)  อยู่ที่หน้าจัดการ Blogger ที่เมนูด้านซ้ายของหน้า ทำดังนี้ 1. ไปเอาการแสดง  Featured Post กับ   Popular Posts ออกก่อน ตามขั้นตอนดังนี้ 1.1 โดยไปที่ Layout 1.2 แล้วไปแก้ไข  Featured Post   gadget  โดยยกเลิกเครื่องหมายหน้าตัวเลือก  Show Featured Post แล้วกด Save 1.3 แล้วไปแก้ไข  Popular Posts   gadget   โดยยกเลิกเครื่องหมายหน้าตัวเลือก  Show  Popular Posts  แล้วกด Save 2. ไปแก้ไขโค้ด ใน Theme  ตามขั้นตอนดังนี้ 2.1 ไปที่  Theme->Edit HTML 2.2 ค้นหาโค้ดนี้  <b:if cond='data:view.isSingleItem'>                 <b:include data='{ shareButtonClass: &quot;post-share-buttons-bottom invisible&quot;, overridden: true }' name='maybeAddShareButtons'/>             <b:else/>               <b:include data='post' name='postFooterJumpLink'/>             </b:if> 2.3 แทนที่ด้วยโค้ดนี้ <b:if cond='data:view.isSingleItem'> &

ทำแถบสีเป็นลิงก์(คล้าย nav page) โค้ดยังไม่เรียบร้อย ยังไม่สวย ใช้ html ถ้า css จะทำได้สวยกว่านี้

  <div  style="    background-color: #fff; float: left;     color: black;   text-align: center;   padding: 14px 16px;   font-weight: bold;   font-size: 20px;">   <a style=" padding: 15px; background: #CCFF66;" target="_blank" class="active" href="https://taxiserviceth.blogspot.com/">HOME</a>   <a style=" padding: 15px; background: #99FF66;" target="_blank" href="https://taxiserviceth.blogspot.com/p/blog-page_7.html">พื้นที่บริการ</a>   <a style=" padding: 15px; background: #66FF66;" target="_blank" href="https://taxiserviceth.blogspot.com/p/blog-page_98.html">อัตราค่าบริการ</a>   <a style=" padding: 15px; background: #00FF66;" target="_blank" href="https://taxiserviceth.blogspot.com/p/blog-page_5.html">รูปแบบรถที่มีให้บริการ</a>   <a style=" padding: 15px; background: #00FF33;" targ

แก้ไขส่วนแท็บชื่อเพจในบล็อก customize page tabs blogger

 แก้ไขส่วนชื่อเพจในบล็อก customize page tabs blogger 1.ไปที่หน้า html 2.ค้นหาบรรทัด .tab 3.แก้ไขเส้นรอบกรอบ Tab page  ไปที่บรรทัด  .tabs .selected{ border-bottom:4px solid $(tabs.selected.color)  แก้ไขเส้นบนล่างซ้ายขวา ด้วยการใส่ 0px ลงไปแทน 4px (ไม่เอาขอบ) หรือ #000 (ไม่มีสี) หรือแก้ไขตามที่ชอบ ใส่รหัสสีที่ชอบลงไปแทน

เอาแถบ Nav Blogger แถบนำทางบล็อกที่อยู่ส่วนหัวออกไป

 เอาแถบ Nav Blogger แถบนำทางบล็อกที่อยู่ส่วนหัวออกไป ขั้นตอน  1. ให้ไปที่  Edit HTML  2. ค้นหาโค้ดในหน้า HTML   ]]></b:skin> 3.แล้วใ่ส่โค้ดนี้ลงไปก่อนบรรทัดโค้ดในข้อ 2 /* NAVBAR */ #navbar {opacity:0; filter:alpha(opacity=0);} #navbar:hover {opacity:0.7; filter:alpha(opacity=70);}
รูปภาพ
คำสั่ง aside แทรกข้อมูลในย่อหน้าข้อความเดิม คำสั่งตามภาพ css aside <style> aside {     width: 30%;   padding-left: 15px;   margin-left: 15px;   float: right;   font-style: italic;   background-color: lightgray; } </style> กรณีเพิ่มภาพเข้าไป ขนาดภาพกำหนดให้เหมาะสมกับส่วน aside ดังตัวอย่างด้านล่าง   โค้ดขนาดภาพ height="auto"  width="80%"></aside>

เอาส่วนด้านข้าง (sidebar) ออกจากบล็อก ให้ส่วนโพสต์เต็มหน้า

เอาส่วนด้านข้างออกจากบล็อก ให้ส่วนโพสต์เต็มหน้า ใช้โค้ด    <style> #rsidebar-wrapper { display: none; } #main-wrapper { width: 1000px!important; } </style>        </head>

โค้ดคำสั่ง วางภาพสวยพอดีใน blogger

รูปภาพ
 โค้ดคำสั่ง วางภาพสวยพอดีใน blogger ภาพพอดีหน้าเว็บ  <div class="separator" style="clear: both;">       <span style="color: black; font-family: KoHo; font-size: large;"> <a href=" " style="display: block; padding: 1em 0px; text-align: center;"> <img border="0" data-original-height="618" data-original-width="3706" height="Auto" src=" " width="1000" /> </a>       </span>     </div> ตัวอย่างภาพ

เอาพื้นที่ Navbar and Navbar Space ด้านบน Blogger ออก

รูปภาพ
เอาพื้นที่ Navbar and Navbar Space  ด้านบน Blogger ออก  โดยเพิ่ม Code ด้านล่าง ในส่วน Customize ไปที่ advance เพิ่ม CSS #navbar-iframe {display: none !important;} body .navbar {height:0px;} .content-outer {margin-top:0px;}

แทรก icon ในบล็อก

รูปภาพ
Icon Libraries With W3.CSS you can use the icon library you like, such as: Font Awesome Icons Google Material Design Icons Bootstrap Icons Using an Icon Library To insert an icon: Include the icon library from a CDN (Content Delivery Network) in the <head> section. Add the name of the icon class to any inline HTML element. Tip:  The <i> and <span> elements are widely used to add icons. To control the size of the icon, change the font-size property of the icon, or use one of the  w3- size  classes: w3-tiny w3-small w3-large w3-xxlarge w3-xxxlarge w3-jumbo   อ่านเพิ่มเติมได้ที่ https://www.w3schools.com/w3css/w3css_icons.asp 1. icon  จาก Font Awesome ที่เว็บไซต์ Font Awesome บุคคลที่เป็นสมาชิกแบบฟรีจะมีไอคอนให้ใช้ได้ฟรี 1588 ตัว และสำหรับสมาชิกแบบ PRO จะมีไอคอนให้ใช้ได้ 7842 ตัว  ในบทความนี้เราจะแนะนำวิธีการใช้รุ่นฟรี   ขั้นแรก ต้องลงชื่อสมัครใช้บัญชีที่ Font A

การกำหนดระยะห่าง ความหมายและการใช้ padding, margin ใน Table และ Image

รูปภาพ
 padding นิยมใช้กับ Table ตัวอย่าง     border: 1px solid black;   background-color: lightblue;   padding-top: 50px;   padding-right: 30px;   padding-bottom: 50px;   padding-left: 80px; margin นิยมใช้กับ image (สามารถใช้ padding แทนได้)

ตัวอย่างโค้ดตาราง css hover , code in html

รูปภาพ
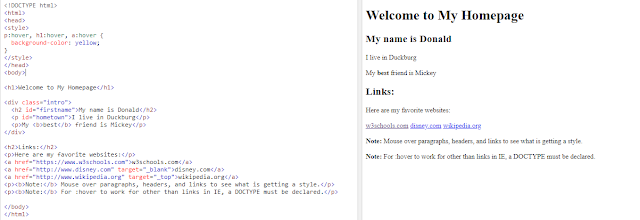
code hover เป็นการตั้งค่าไฮไลท์ให้ข้อความเมื่อเม้าส์อยู่เหนือสิ่งที่เราระบุ  ตัวอย่าง  ไฮไลท์แถวในตาราง เมื่อเม้าส์อยู่เหนือแถวให้มีสีตามที่ระบุ tr:hover {background-color:#f5f5f5;} ไฮไลท์ข้อความ ระบุตำแหน่ง หรือชนิดของ text .. https://www.w3schools.com/cssref/sel_hover.asp https://www.w3schools.com/cssref/tryit.asp?filename=trycss_sel_hover_more css  style>  p:hover, h1:hover, a:hover {   background-color: yellow; }  </style  ตัวอย่าง hover แบบตั้งค่าความโปร่งใสของสี ตัวอย่าง hover แบบตั้งค่าเปลี่ยนแบบขนาดสีลักษณะฟ้อนต์ ตัวอย่างเขียนสไตล์ใน html ไม่ใช้ css  ตัวอย่างโค้ดตาราง มี hover <!DOCTYPE html> <html> <head> <style> table {   border-collapse: collapse;   width: 100%;   empty-cells: hide; } th {   padding: 8px;   text-align: center; } td {   padding: 8px;   text-align: center;   border-bottom: 1px solid #ddd; } td.a {text-align: left;} td.b {text-align: center;} td.c {text-align: right;} tr:hover {background-color:#f5f5f5;} </style> </head>

ม.รามคำแหงเปิดรับสมัครนักศึกษาสาขาการบัญชีและการเงิน(ภาคพิเศษ) รับสมัครถึง 30 มิถุนายน 2564

รูปภาพ
 ม.รามคำแหงเปิดรับสมัครนักศึกษาสาขาการบัญชีและการเงิน(ภาคพิเศษ)  รุ่นที่ 14 ภาค 1 ปีการศึกษา 2564 รับสมัครถึง 30 มิถุนายน 2564 เรียนจันทร์-พฤหัส เวลา 17.30-21.30 น. เป็นสาขาที่น่าเรียนมาก เพราะจบมาไม่ตกงานแน่นอน สอบถามรายละเอียด : โทร. 02-310-8237 / 064-565-2992 สำนักงาน : คณะบริหารธุรกิจ ชั้น 4 มหาวิทยาลัยรามคำแหง หัวหมาก ห้องโครงการบัญชีและการเงิน

ชี้ทางทำธุรกิจดรอปชิปกับเว็บ smadropship

 เริ่มต้นธุรกิจดรอปชิปยังไงดี ลองไปอ่านรายละเอียดที่นี่ดีกว่า https://smadropship.com/page/

ชี้เป้าเว็บไซต์แจกฟรีไอค่อน

 เว็บไซต์นี้แจกฟรีไอค่อนสำหรับใช้ในเว็บ/แอพ https://mobiriseicons.com/

เพิ่มข้อความลิขสิทธิ์/เครดิตของคุณเองในส่วนท้ายของบล็อก add your own text linked copyright messages and other information

 เพิ่มข้อความลิขสิทธิ์/เครดิตของคุณเองในส่วนท้ายของบล็อก  โดยเพิ่มแกตเจ็ด  Text  or  HTML/JavaScript  Gadget ในส่วนท้ายของ blog footer เช่นข้อความ  ©️ 2021 KnowNow – By Narisa Nuamjit – all rights reserved. Table of Contents How to Hide Powered by Blogger Attribution Link from blog Footer How to Remove Powered by Blogger Attribution Widget from blog Footer วิธีแรก  เพิ่มโค้ด html (Theme Edit): วิธีที่สอง   ปรับตั้งค่าของ Widget (Unlock & Remove Blogger Attribution)

ซ่อน/เอาคำว่า Powered by Blogger. ที่อยู่ท้ายหน้า Blogger ออกไป hide or remove Powered by Blogger Attribution Gadget

รูปภาพ
 ซ่อน/เอาคำว่า Powered by Blogger.  ที่อยู่ท้ายหน้า Blogger ออกไป วิธีแรก ทำได้โดยเพิ่มโค้ด html ใน Theme ค้นหาโค้ด  ]]></b:skin> เพิ่มโค้ดเหนือโค้ดข้างต้น ตามภาพตัวอย่าง ดังนี้ #Attribution1{display:none;} ]]></b:skin>

Example

รูปภาพ
 float : https://www.w3schools.com/css/css_float_examples.asp https://www.w3schools.com/css/tryit.asp?filename=trycss_float_boxes_flex c0de <!DOCTYPE html> <html> <head> <style> .flex-container {   display: flex;   flex-wrap: nowrap;   background-color: DodgerBlue; } .flex-container .box {   background-color: #f1f1f1;   width: 50%;   margin: 10px;   text-align: center;   line-height: 75px;   font-size: 30px; } </style> </head> <body> <h1>Flexible Boxes</h1> <div class="flex-container">   <div class="box">Box 1 - This is some text to make sure that the content gets really tall. This is some text to make sure that the content gets really tall.</div>   <div class="box">Box 2 - My height will follow Box 1.</div> </div> <p>Try to resize the browser window to see the flexible layout.</p> <p><strong>Note:</strong> Flexbox is not supported in Int

create custom blog to your website

เพิ่มให้ blog ใช้ Font Awesome แก้ไข jump link / break link set default font size blog เพิ่ม link ให้โทรหา tel: remove svg icon (บนสุดของหน้า) ซึ่งจะแสดงลิงก์ไป profile remove Atom subscript link remove report abuse remove powered by blogger  แก้สีส่วนหัว สีชื่อเว็บ เพิ่ม code link style sheet  ก่อน <style> remove pencil icon remove wrench icon เรียงภาพ / ประกอบภาพกับข้อความ ด้วย flexible box